
유디의 공간정보·개발일기
1. 0830_ Android Studio에서 Kotlin으로 데이터연동 본문
Android Studio 실행

Java와 Kotlin의 차이
- extends가 없고 : (콜론)이 붙는다.
- 부모클래스에 ()가 붙는다. : primary constructor(기본 생성자)를 호출하는 소괄호이다.
- ; (세미콜론)이 없다.
* activity_main.xml --> 화면구성
* ActivityMain.kt --> 소스코드
- build.gradle에 코드 추가
buildFeatures {
viewBinding true
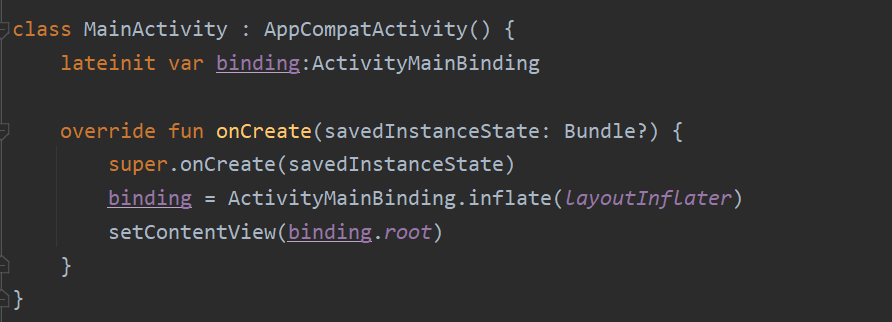
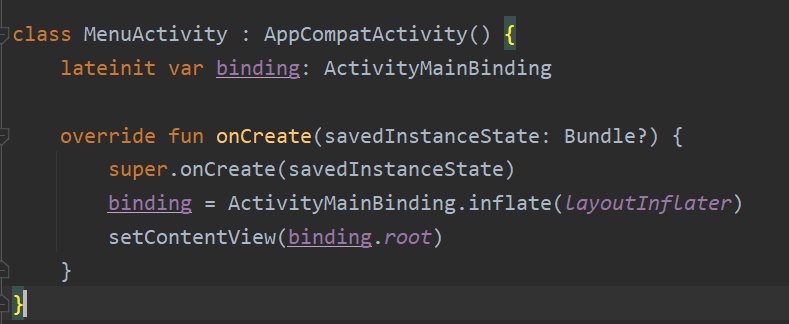
}- MainActivity.kt에 코드 추가 수정
- plaintext 칸에 글자를 입력하고 확인 버튼을 누르면 입력한 글자가 뜨도록 함
binding.showButton.setOnClickListener {
            var input1 = binding.input1.text.toString()
            //binding.output1.text = "안녕하세요!"
            binding.output1.text = "입력한 글자 : ${input1}"
        }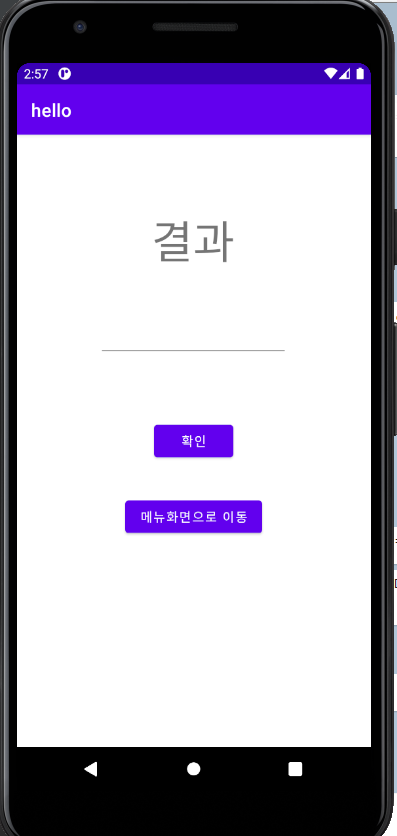
- 새 empty 화면 만들기
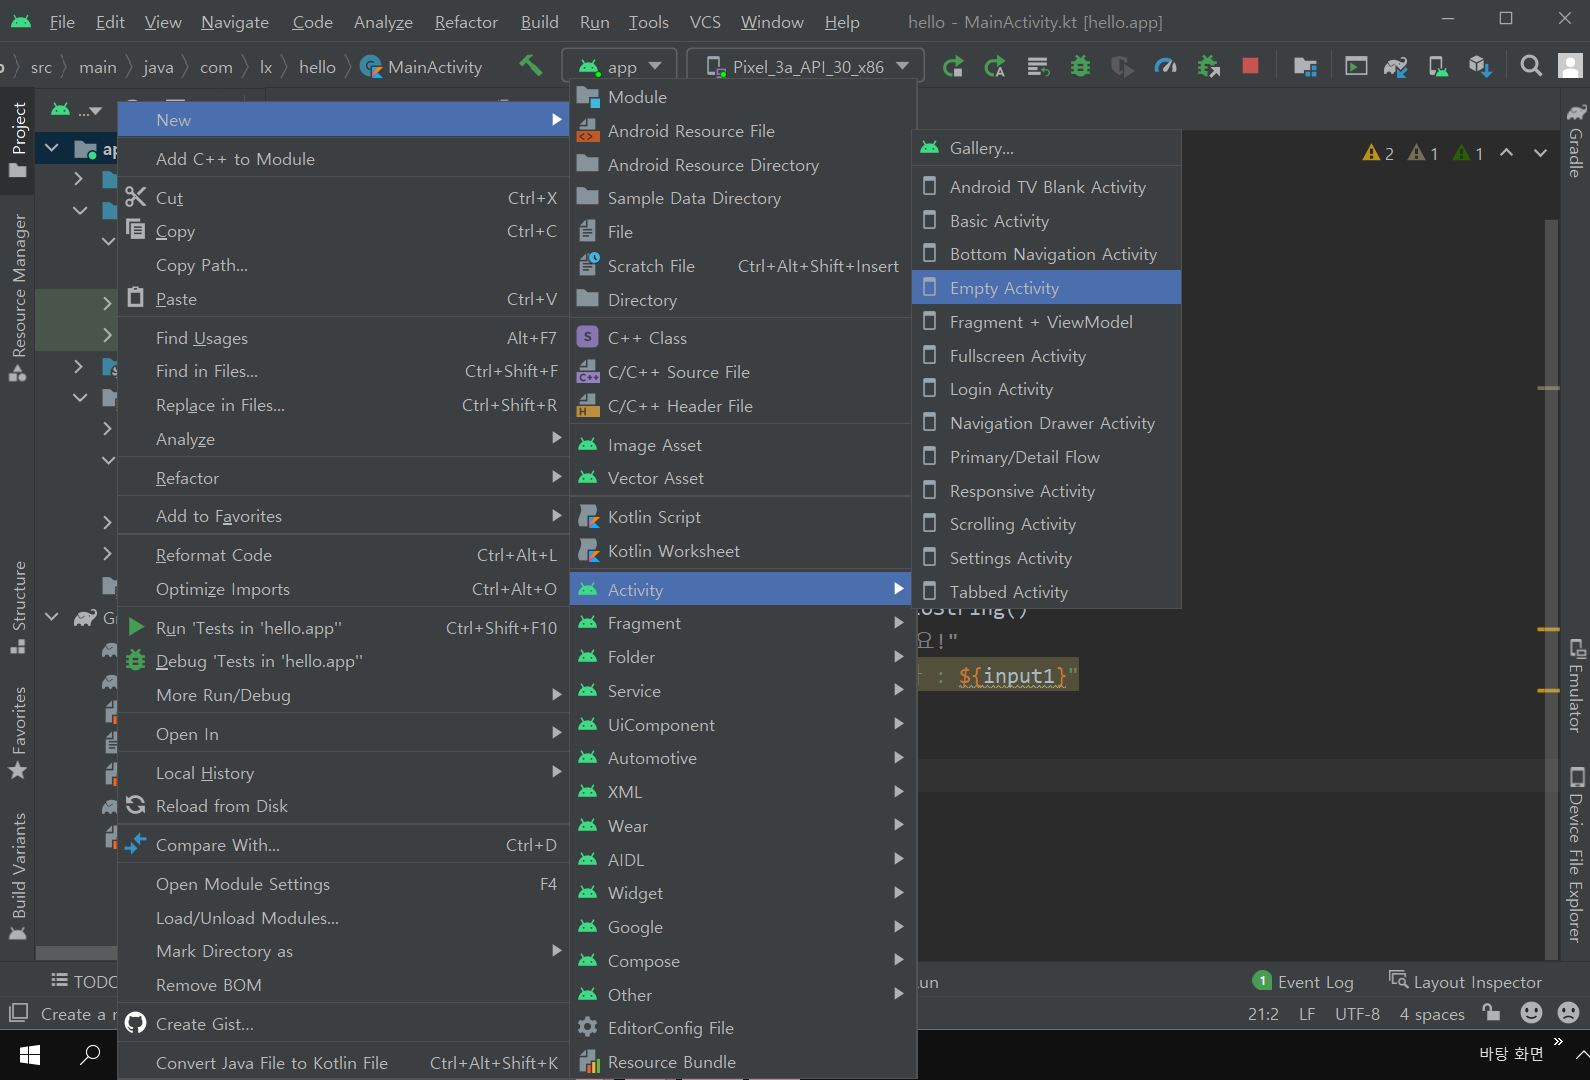
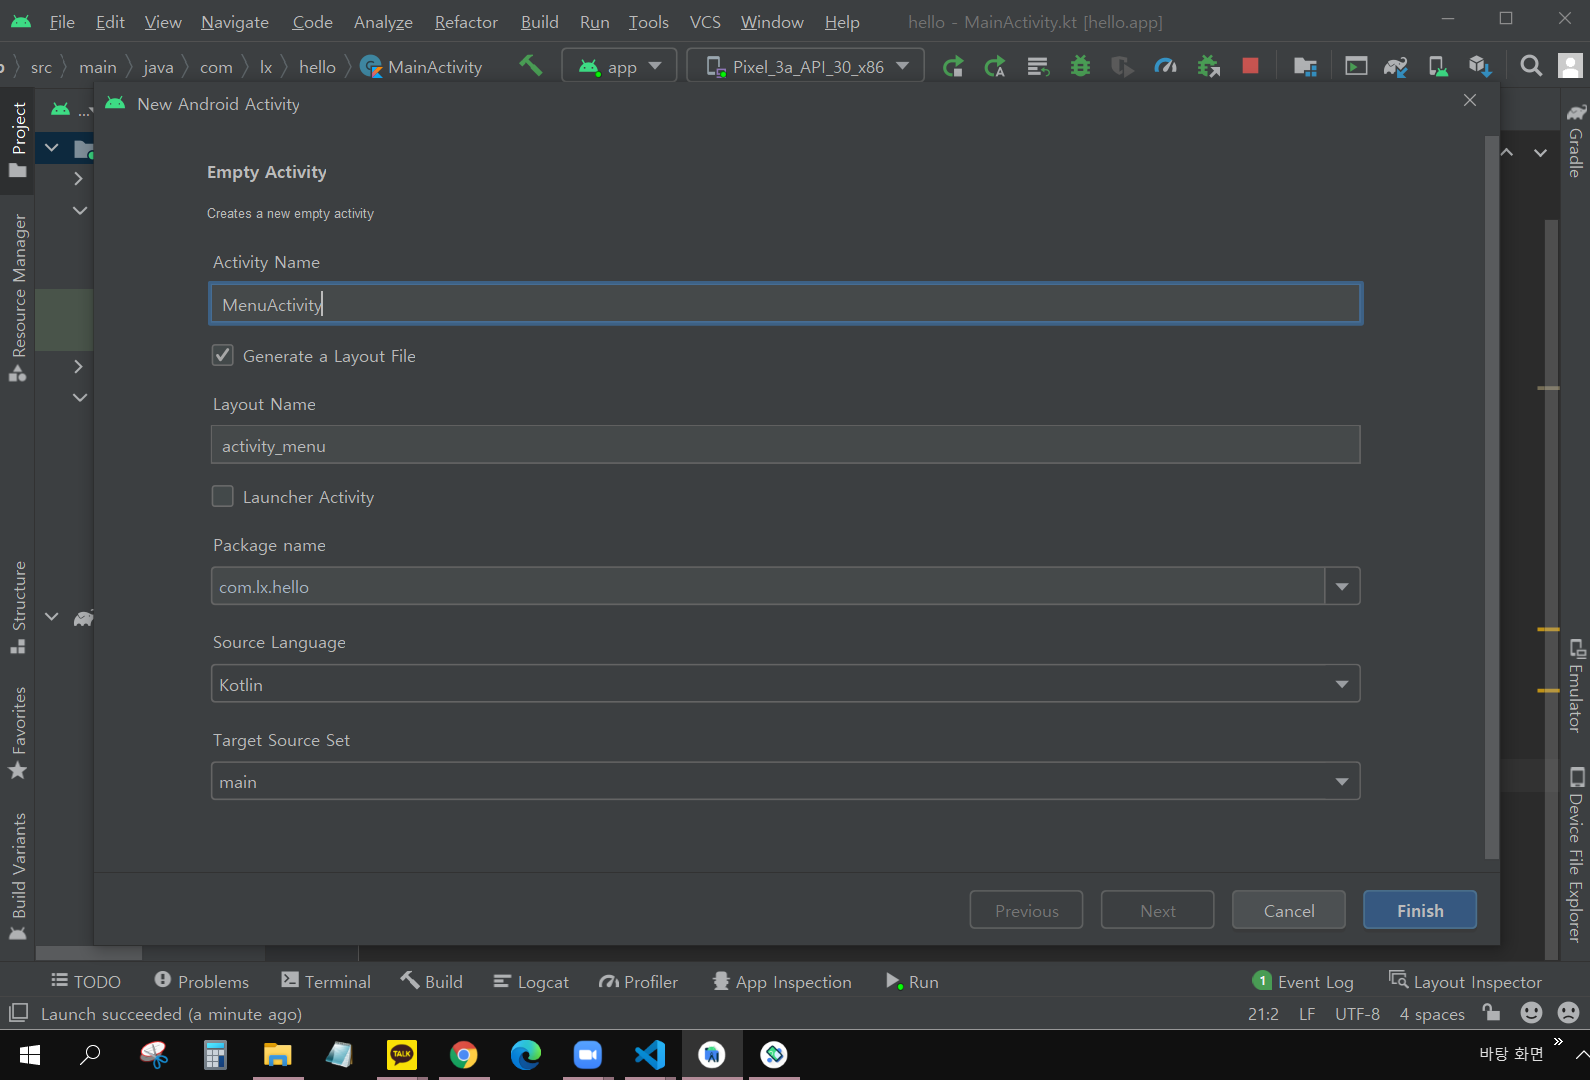
MenuActivity.kt 코드 추가
[확인1] 버튼
- Wrapping / Unwrapping
- null값 넣기
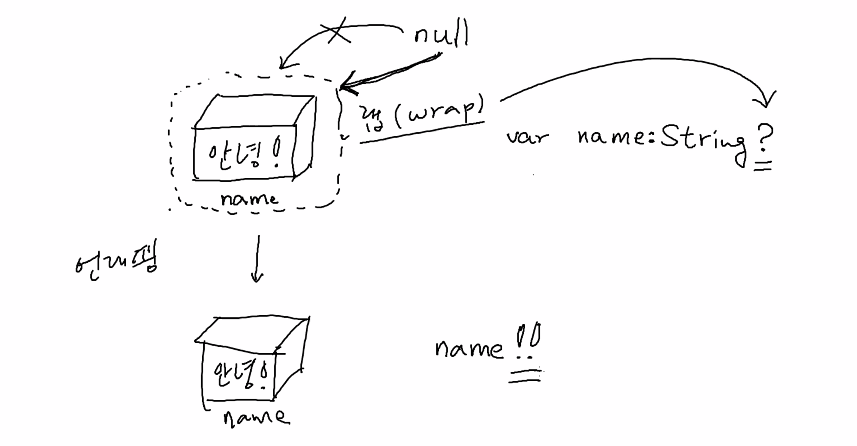
    // 널허용 자료형, 랩핑/언랩핑!!
    // String name4 == null; //Java
    var name4:String? = null
    name4 = "홍길동4"

System.out.println("name4의 값 : ${name4!!}")
binding.output2.append("name4의 값 : ${name4}\n") //append : 글자를 붙여줌
- var name4:String? = null
? 를 사용해서 null값을 넣을 수 있음
- ${name4!!}
!! 를 붙이면 Unwrapping을 하는 것
[확인2] 버튼
- 자바에서의 함수 생성과는 방식이 다름 주의
- 코틀린에선 매개변수의 타입과 리턴타입을 다음처럼 사용한다.
    // int add(int a, int b) {
    //     return a + b;
    // }
    fun add(a:Int, b:Int):Int {
        return a + b
    }
binding.showButton2.setOnClickListener {
// 함수상자
var result1 = add(10, 10)
var result2 = add(b=10, a=10) //이름을 명시해 주면 순서도 바꿀 수 있음 (자바에서는 불가)
binding.output2.append("result2의 값 : ${result2}")
}- 위와 같은 결과를 다른 방식으로
  binding.showButton2.setOnClickListener {
    // 함수상자
    var result1 = add(10, 10)
    var result2 = add(b=10, a=10) //이름을 명시해 주면 순서도 바꿀 수 있음 (자바에서는 불가)
    binding.output2.append("result2의 값 : ${result2}")
    printLog("result2의 값 : ${result2}")
  }
}

fun printLog(message:String) {
	binding.output2.append("${message}\n")
}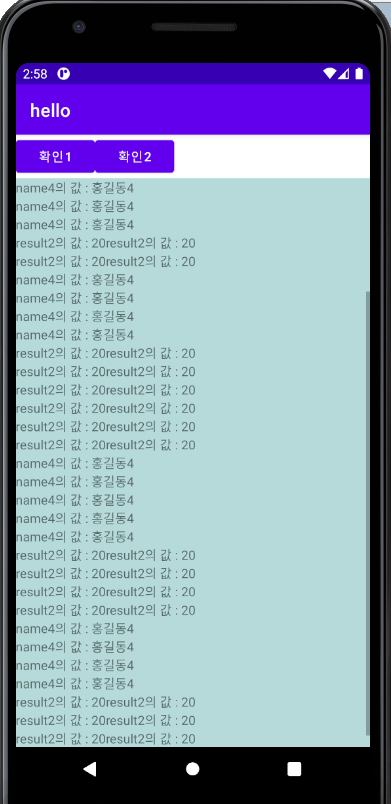
- \n : 줄바꿈하여 결과값 표시
- 값이 화면 밖으로 넘어가서 추가되면 스크롤바가 활성화 됨 (.xml에서 scroll bar를 사용했기 때문에)
[람다식]
<코드 줄이기>
1. 람다식을 만들어서 변수상자에 넣기
- 람다식 : 함수를 일급객체로 다룬다(= 함수를 변수에 할당할 수 있다)
매개변수에 함수를 넣을 수 있다
요즘 만들어진 언어들은 이를 제공함
그래서 함수를 축약해서 표시할 필요가 있고 람다식은 {}중괄호를 쓰고 화살표를 붙인다.
* 람다식의 형태 : { -> }
var add2 = { a:Int, b:Int -> a + b } //return은 생략, a+b가 반환됨fun add(a:Int, b:Int):Int { //에서 ()안의 내용이 람다식 화살표 왼쪽으로
return a + b //에서 {}안의 내용이 람다식 화살표 오른쪽으로
}
- 람다식 add2 함수 화면에 출력하기
var result3 = add(20, 20)
printLog("result3의 값 : ${result3}")
2. 익명함수로 만들어서 변수상자에 넣기
var add4 = fun (a:Int, b: Int):Int {
	return a + b
}
3. 람다식의 다른 형태-1
var add5:(Int,Int)->Int = {a:Int, b:Int -> a + b}
4. 람다식의 다른 형태-2 (권장)
var add6:(Int,Int)->Int = {a, b -> a + b}- a와 b가 Int형임을 추론할 수 있어서 생략
- java 파일로 class Calc 만들기
이런식으로 필요할 땐 자바를 파일단위로 코틀린을 쓰면서 같이 쓸 수 있다.
package com.lx.hello;

public class Calc {

    public int add(int a, int b) {
        return a + b;
    }
}
<MenuActivity.kt>
var calc1 = Calc() //붕어빵(객체) 만들 때 new 안씀
var result4 = calc1.add(30, 30)[콜백함수 경량화(람다식) 이해하기]
1. 콜백함수 실행하기
doAction(fun ():Int {
	printLog("콜백함수 안에서 출력됨")
	return 10
})
2. 콜백함수의 다른 형태-1
doAction({ ->
	printLog("콜백함수 안에서 출력됨")
	10
})
3. 콜백함수의 다른 형태-2
doAction({
	printLog("콜백함수 안에서 출력됨")
	10
})
4. 콜백함수의 다른 형태-3
doAction() {
	printLog("콜백함수 안에서 출력됨")
	10
}
5. 콜백함수의 다른 형태-4 (권장)
doAction {
printLog("콜백함수 안에서 출력됨")
10
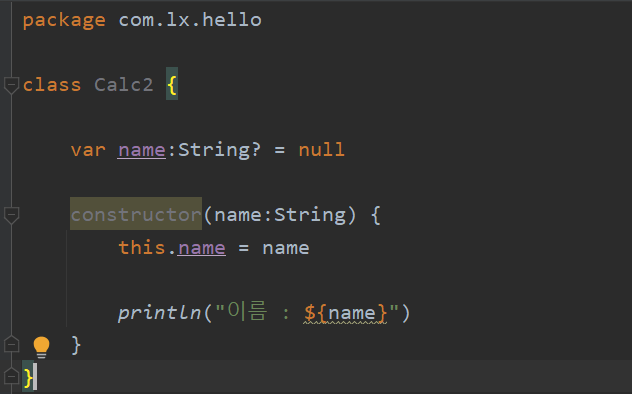
}[생성자]
<Calc1.kt> kotlin class 생성
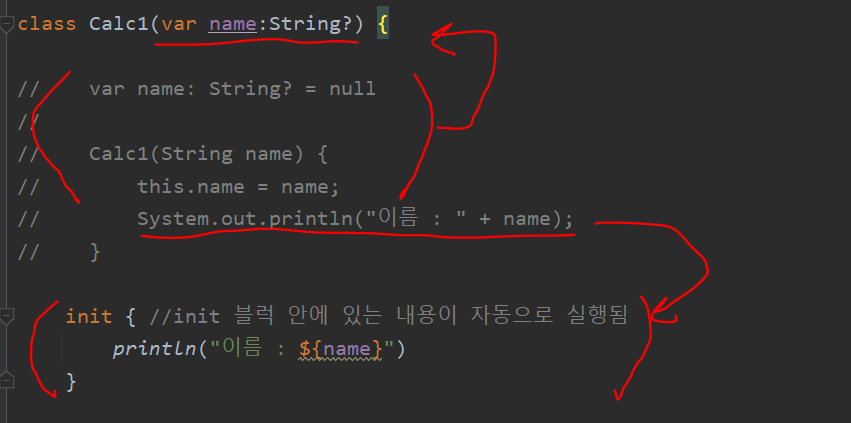
- 생성자는 2가지 형태가 있다.
[상속] open과 override
<Person.kt> kotlin class생성
<Student.kt> kotlin class생성
<Baby.kt> kotlin class생성
package com.lx.hello

open class Person(open var name:String?) {

    open fun walk() {

    }
}
package com.lx.hello
class Student(override var name:String?) : Person(name) {
override fun walk() {
}
}package com.lx.hello
class Baby : Person {
constructor(name:String?):super(name) { //2차 생성자 함수를 생성, super는 부모
}
}[인터페이스] abstract(추상클래스), override
<Calculator.kt> kotlin interface 생성
<Calc3.kt> kotlin class 생성
package com.lx.hello

interface Calculator {

    fun add(a:Int, b:Int):Int

    fun subtract(a:Int, b:Int):Int
}
package com.lx.hello
class Calc3 : Calculator {
override fun add(a:Int, b:Int):Int {
return a + b
}
override fun subtract(a:Int, b:Int):Int {
return a - b
}
}
<Calc4.kt> kotlin class 생성 - 인터페이스(약속)를 구현
package com.lx.hello

abstract class Calc4 : Calculator { //추상클래스

    override fun add(a:Int, b:Int):Int {
        return a + b
    }

    abstract override fun subtract(a:Int, b:Int):Int
}
<Calc5.kt> kotlin class생성 - Calc4를 상속
package com.lx.hello

class Calc5 : Calc4() { //()안이 빈 기본 생성자

    override fun subtract(a: Int, b: Int): Int {
        return a - b
    }
}
인터페이스는 생성자 없어서 소괄호가 붙지 않는다.
- MenuActivity.kt
binding.showButton3.setOnClickListener {
            // 붕어빵 틀에서 붕어빵 만들기
            var calc1 = Calc1("이름")
            calc1.name = "홍길동1"

            var calc2 = Calc1("홍길동1")
            printLog("calc2의 이름 : ${calc2.name}") //기본 생성자

            // 완성 안된 붕어빵 틀에서 1마리 만들기 (추상클래스에는 ()가 붙음)
            var calc3 = object: Calc4() {
                override fun subtract(a: Int, b: Int): Int {
                    return a - b
                }
            }

            // 약속만 한 인터페이스에서 1마리 만들기 (인터페이스에는 () 안붙음)
            var calc4 = object: Calculator {
                override fun add(a: Int, b: Int): Int {
                    return a + b
                }

                override fun subtract(a: Int, b: Int): Int {
                    return a - b
                }
            }

       }
new project : CustomerApp 생성
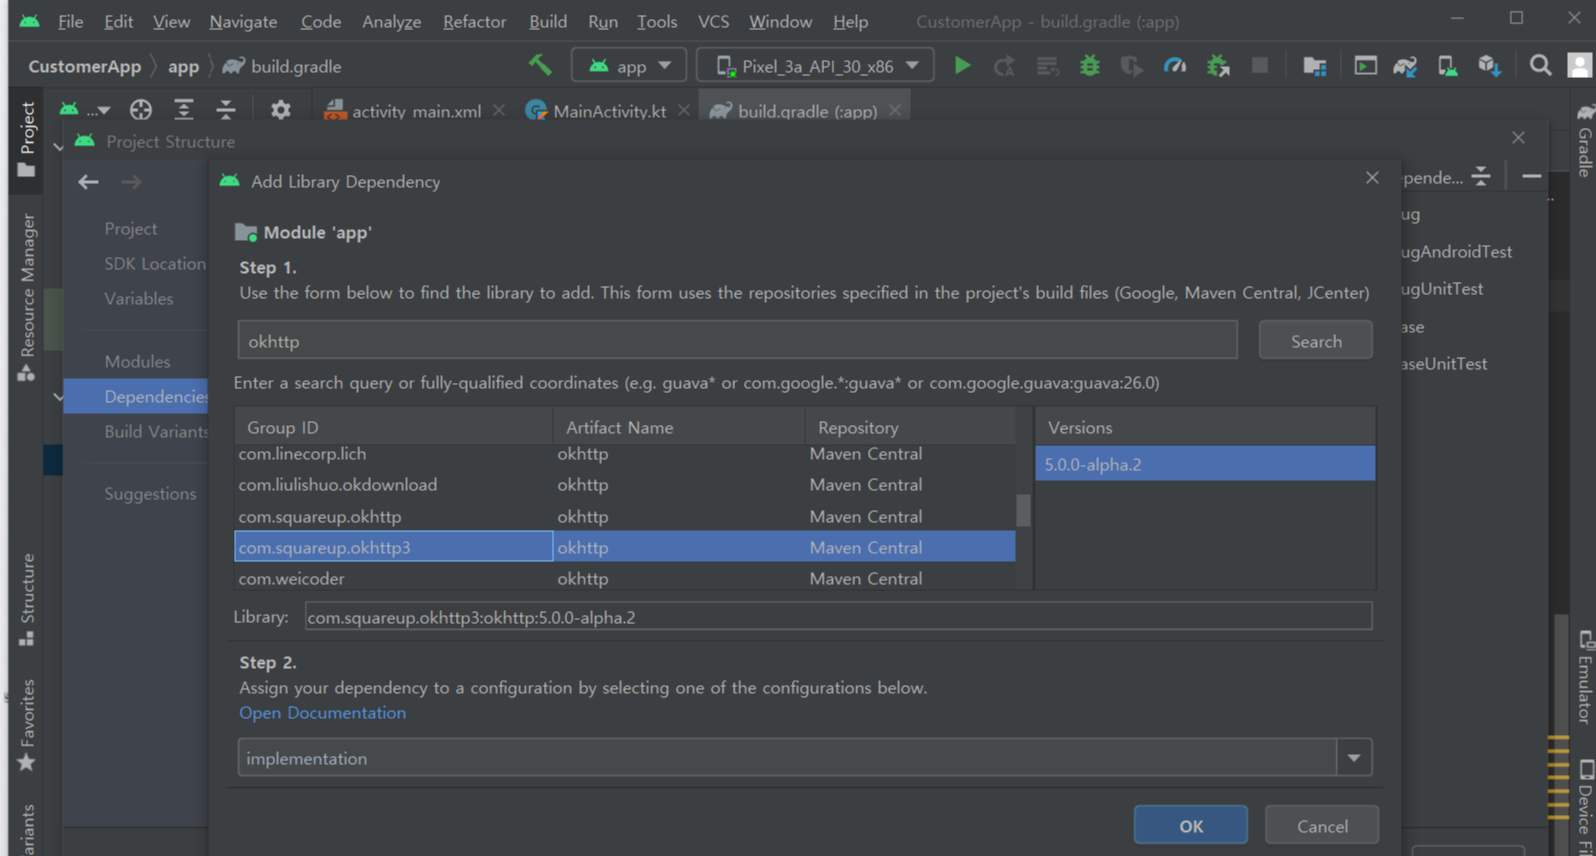
- 웹서버 연결
- File - Project Structure - Add Library Dependency
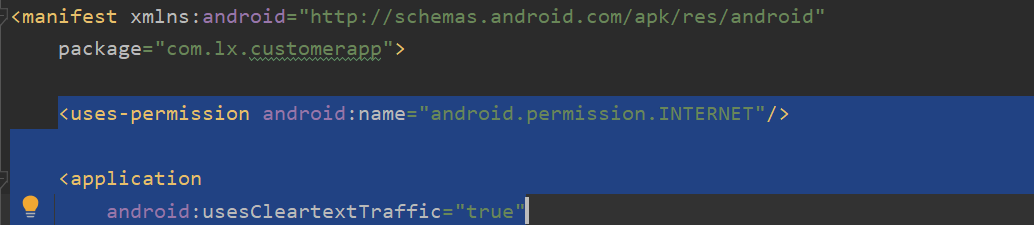
- AndroidManifest.xml에 코드 추가
외부라이브러리 넣었고 manifest에서 권한 넣어준 것
- Postman도 실행
- ubiaccess-framework > index.html 의 터미널창에서 node index.js로 서버 실행
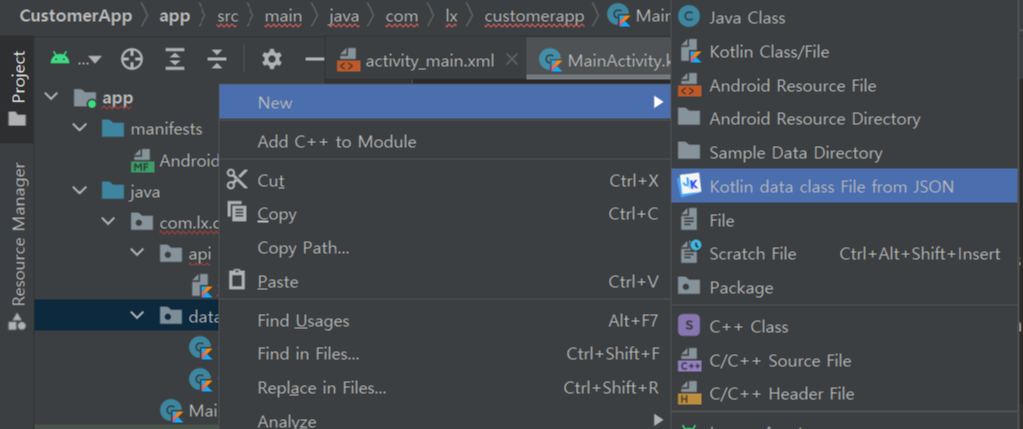
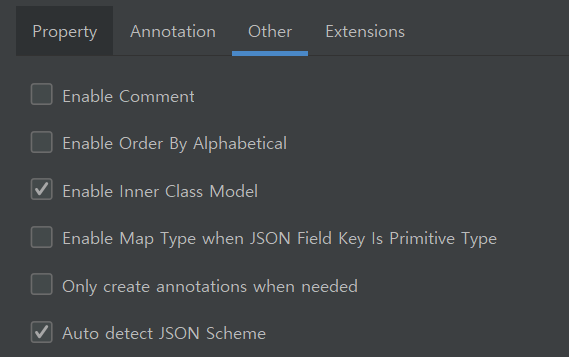
- Postman의 코드를 android studio의 data폴더에서 마우스 우클릭 - New - Kotlin data class File from JSON 클릭 - 코드 붙여넣기 - (첫 실행시에만 설정) Advanced 클릭 설정 - Annotation메뉴에서 GSON 체크, Other에서 다음처럼 체크
CustomerApp <MainActivity.kt>
package com.lx.customerapp

import androidx.appcompat.app.AppCompatActivity
import android.os.Bundle
import com.lx.customerapp.api.CustomerClient
import com.lx.customerapp.data.CustomerListResponse
import com.lx.customerapp.data.CustomerResponse
import com.lx.customerapp.databinding.ActivityMainBinding
import retrofit2.Call
import retrofit2.Callback
import retrofit2.Response

class MainActivity : AppCompatActivity() {
    lateinit var binding: ActivityMainBinding

    override fun onCreate(savedInstanceState: Bundle?) {
        super.onCreate(savedInstanceState)
        binding = ActivityMainBinding.inflate(layoutInflater)
        setContentView(binding.root)

        binding.button.setOnClickListener {
            // 웹서버로 고객 목록 요청하기
            CustomerClient.api.getCustomerList(
                user="john"
            ).enqueue(object: Callback<CustomerListResponse> {
                override fun onResponse(call: Call<CustomerListResponse>, response: Response<CustomerListResponse>) {
                    printLog("onResponse 호출됨")

                    var total = response.body()?.output?.header?.total
                    printLog("고객 수 : ${total}")
                }

                override fun onFailure(call: Call<CustomerListResponse>, t: Throwable) {
                    printLog("onFailure 호출됨")
                }

            })

        }

        binding.button2.setOnClickListener {
            CustomerClient.api.postCustomerCreate(
                name="새 홍길동1",
                age="23",
                mobile="010-3000-3000"
            ).enqueue(object: Callback<CustomerResponse> {
                override fun onResponse(call: Call<CustomerResponse>, response: Response<CustomerResponse>) {
                    printLog("onResponse 호출됨")

                    if (response.body()?.output?.body?.affectedRows!! > 0) {
                        printLog("고객 정보 추가 성공")
                    }
                }

                override fun onFailure(call: Call<CustomerResponse>, t: Throwable) {
                    printLog("onFailure 호출됨")
                }

            })
        }

        binding.button3.setOnClickListener {
            CustomerClient.api.postCustomerCreate(
                name="새 홍길동2",
                age="24",
                mobile="010-4000-4000"
            ).enqueue(object: Callback<CustomerResponse> {
                override fun onResponse(call: Call<CustomerResponse>, response: Response<CustomerResponse>) {
                    printLog("onResponse 호출됨")

                    if (response.body()?.output?.body?.affectedRows!! > 0) {
                        printLog("고객 정보 수정 성공")
                    }
                }

                override fun onFailure(call: Call<CustomerResponse>, t: Throwable) {
                    printLog("onFailure 호출됨")
                }

            })
        }

    }

    fun printLog(message:String) {
        binding.output1.append("${message}\n")
    }

}
<CustomerApi.kt>
package com.lx.customerapp.api

import com.lx.customerapp.data.CustomerListResponse
import com.lx.customerapp.data.CustomerResponse
import okhttp3.Interceptor
import okhttp3.OkHttpClient
import okhttp3.logging.HttpLoggingInterceptor
import retrofit2.Call
import retrofit2.Retrofit
import retrofit2.converter.gson.GsonConverterFactory
import retrofit2.http.*
import java.util.concurrent.TimeUnit

interface CustomerApi {

    @GET("/test1")
    fun getCustomerList(
        @Query("user") user:String? = null
    ): Call<CustomerListResponse>

    @FormUrlEncoded
    @POST("/test1")
    fun postCustomerCreate(
        @Field("name") name:String? = null,
        @Field("age") age:String? = null,
        @Field("mobile") mobile:String? = null
    ): Call<CustomerResponse>

    @FormUrlEncoded
    @PUT("/test1/1")
    fun putCustomerUpdate(
        @Field("name") name:String? = null,
        @Field("age") age:String? = null,
        @Field("mobile") mobile:String? = null
    ): Call<CustomerResponse>
}

class CustomerClient {

    // 붕어빵 틀에 진짜 변수상자나 함수상자를 붙여두는 것 (CustomerClient.count 으로 접근 가능)
    companion object {

        private var instance:CustomerApi? = null

        val api:CustomerApi
            get() {
                return getInstance()
            }

        @Synchronized
        fun getInstance():CustomerApi {
            if (instance == null) {
                instance = create()
            }

            return instance as CustomerApi
        }


        // 기본 URL
        private const val BASE_URL = "http://본인PC의 ip주소:8001"

        // 헤더 속성
        private const val CLIENT_ID = "MOMS"
        private const val CLIENT_SECRET = "123456"
        var userId:String = ""

        fun create(): CustomerApi {
            val httpLoggingInterceptor = HttpLoggingInterceptor()
            httpLoggingInterceptor.level = HttpLoggingInterceptor.Level.BODY

            val headerInterceptor = Interceptor {
                val request = it.request()
                    .newBuilder()
                    .addHeader("X-Client-Id", CLIENT_ID)
                    .addHeader("X-Client-Secret", CLIENT_SECRET)
                    .addHeader("X-Client-UserId", userId)
                    .build()
                return@Interceptor it.proceed(request)
            }

            val client = OkHttpClient.Builder()
                .addInterceptor(headerInterceptor)
                .addInterceptor(httpLoggingInterceptor)
                .connectTimeout(40, TimeUnit.SECONDS)  // 타임아웃 시간 설정 40초
                .build()

            return Retrofit.Builder()
                .baseUrl(BASE_URL)
                .client(client)
                .addConverterFactory(GsonConverterFactory.create())
                .build()
                .create(CustomerApi::class.java)
        }

    }

}
- Android Studio에서 가상 디바이스 실행시켜서 버튼 눌렀을 때 데이터가 잘 전송되어 나타나는지 확인
'Kotlin + Android Studio' 카테고리의 다른 글
| Layout-ScrollView 사용할 때 (0) | 2021.10.09 |
|---|---|
| [Kotlin] val 과 var의 차이점 (0) | 2021.10.01 |
