
유디의 공간정보·개발일기
3. 1004_RecyclerView, Adapter, SQL로 좌표 쿼리문, tab 본문
- MyMap 프로젝트
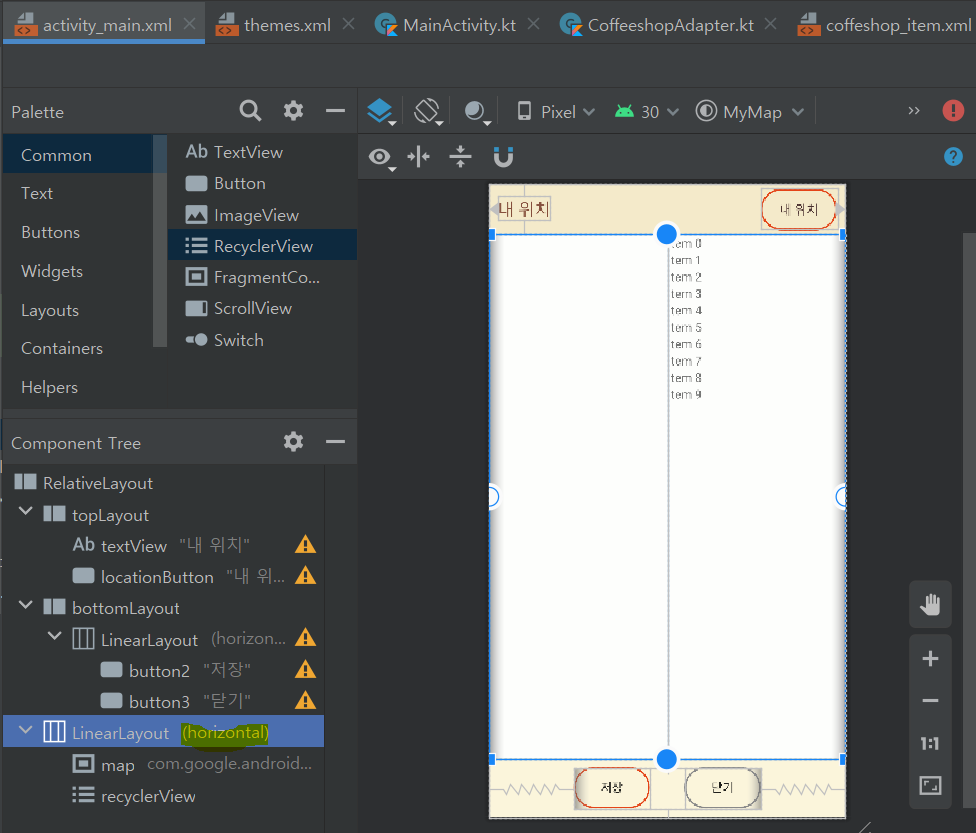
- recyclerView 추가하고 레이아웃 만들기
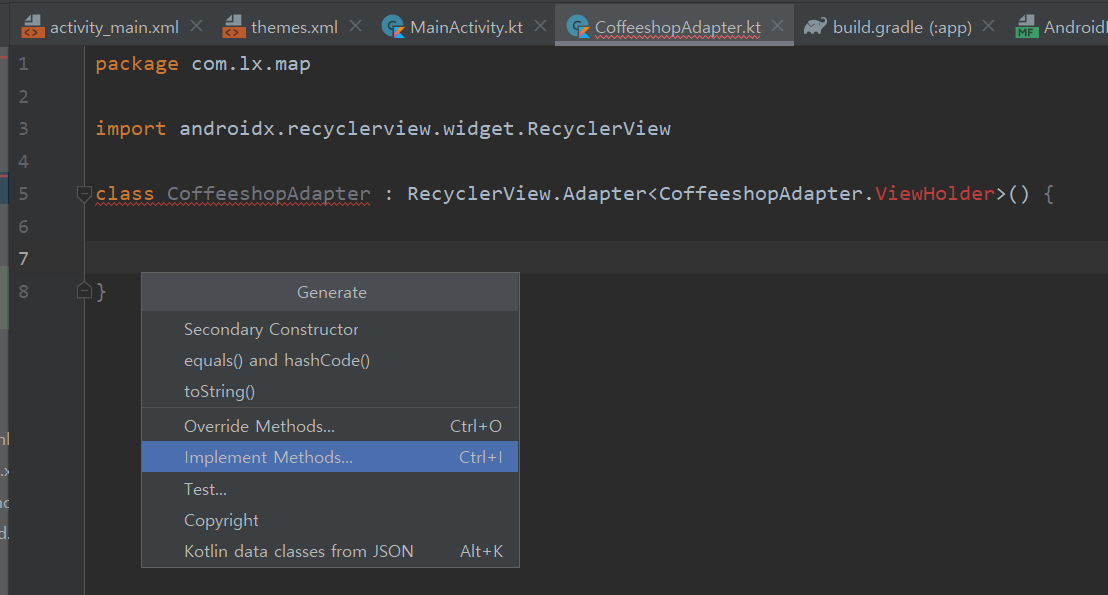
- CoffeeshopAdapter 코틀린클래스 만들기
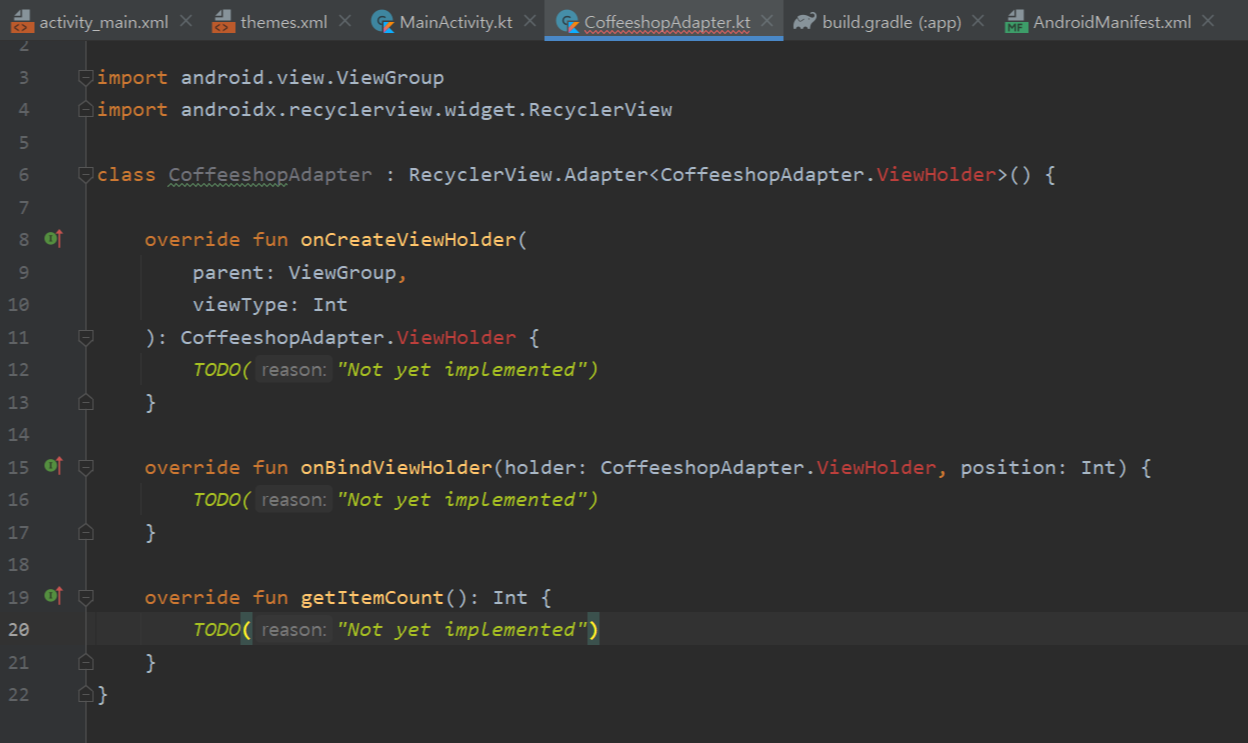
상속 코드 적고 - 마우스우클릭 -Generate - Implement Methods - 항목 3개 전부 선택
3개의 override 메서드가 생기는데 코드 수정
package com.lx.map

import android.view.LayoutInflater
import android.view.ViewGroup
import androidx.recyclerview.widget.RecyclerView
import com.lx.map.databinding.CoffeshopItemBinding

class CoffeeshopAdapter : RecyclerView.Adapter<CoffeeshopAdapter.ViewHolder>() {

    var items = ArrayList<Coffeeshop>() //여러개의 커피숍 객체를 담아둔 것을 ArrayList에 넣어둠

    override fun getItemCount() = items.size //호출하면서 몇 개의 아이템을 갖고있는지 물어봄

    // 3개의 아이템을 나열해주기
    override fun onCreateViewHolder(parent: ViewGroup, viewType: Int): CoffeeshopAdapter.ViewHolder {
        val binding = CoffeshopItemBinding.inflate(LayoutInflater.from(parent.context), parent, false)
        return ViewHolder(binding)
    }

    // 데이터 재사용
    override fun onBindViewHolder(holder: CoffeeshopAdapter.ViewHolder, position: Int) {
        val item = items[position]
        holder.setItem(item)
    }

    inner class ViewHolder(val binding:CoffeshopItemBinding) : RecyclerView.ViewHolder(binding.root) {
        fun setItem(item:Coffeeshop) {
            binding.output1.text = item.name
            binding.output2.text = item.address
            binding.output3.text = item.tel
        }
    }

}
- 코드 추가
var items = ArrayList<Coffeeshop>() //여러개의 커피숍 객체를 담아둔 것을 ArrayList에 넣어둠
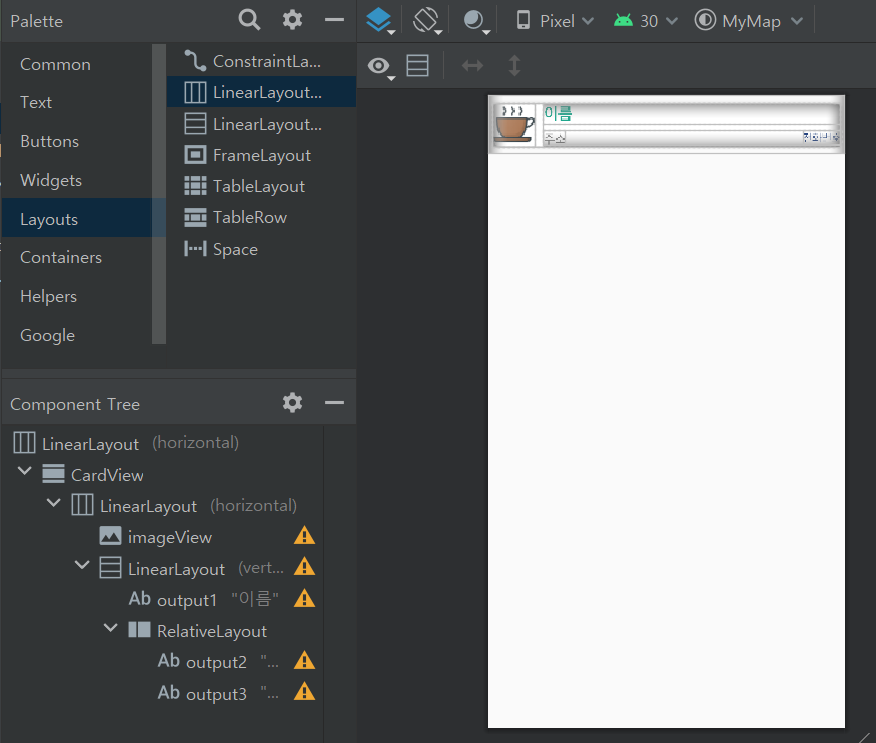
- layout폴더에 새 파일로 coffeshop_item.xml 만들기
- coffee.png 파일 drawble 폴더에 넣기
- cardview
* cardCornerRadius : 모서리 둥글게
* cardElevation : 카드가 입체적으로 튀어나오게
- CoffeeshopAdapter 클래스 코드
package com.lx.map

import android.view.LayoutInflater
import android.view.ViewGroup
import androidx.recyclerview.widget.RecyclerView
import com.lx.map.databinding.CoffeshopItemBinding

class CoffeeshopAdapter : RecyclerView.Adapter<CoffeeshopAdapter.ViewHolder>() {

    var items = ArrayList<Coffeeshop>() //여러개의 커피숍 객체를 담아둔 것을 ArrayList에 넣어둠

    override fun getItemCount() = items.size //호출하면서 몇 개의 아이템을 갖고있는지 물어봄

    // 3개의 아이템을 나열해주기
    override fun onCreateViewHolder(parent: ViewGroup, viewType: Int): CoffeeshopAdapter.ViewHolder {
        val binding = CoffeshopItemBinding.inflate(LayoutInflater.from(parent.context), parent, false)
        return ViewHolder(binding)
    }

    // 데이터 재사용
    override fun onBindViewHolder(holder: CoffeeshopAdapter.ViewHolder, position: Int) {
        val item = items[position]
        holder.setItem(item)
    }

    inner class ViewHolder(val binding:CoffeshopItemBinding) : RecyclerView.ViewHolder(binding.root) {
        fun setItem(item:Coffeeshop) {
            binding.output1.text = item.name
            binding.output2.text = item.address
            binding.output3.text = item.tel
        }
    }

}
- coffeshop.kt 코드
package com.lx.map

data class Coffeeshop (
    var name:String?,
    var address:String?,
    var tel:String?,
    //경위도 좌표를 넣어볼 건데 Double은 소수점을 포함한 큰 숫자
    var latitude:Double?,
    var longitude:Double?
)
- MainActivity 코드, 리사이클러뷰 초기화하는 코드
// 리사이클러 뷰 초기화하기
initRecyclerView()
fun initRecyclerView() {
val layoutManager = LinearLayoutManager(this, LinearLayoutManager.VERTICAL, false)
binding.recyclerView.layoutManager = layoutManager
coffeeshopAdapter = CoffeeshopAdapter()
// 샘플 데이터 추가하기 : ()안에 이름, 주소, 전화번호, 좌표 넣기
val coffeeshop1 = Coffeeshop("투썸플레이스 세관사거리점", "서울 강남구 언주로 703", "02-545-2377", 37.515838, 127.035002)
val coffeeshop2 = Coffeeshop("스타벅스 세관사거리점", "서울특별시 강남구 논현2동 언주로 650", "1522-3232", 37.514966, 127.035711)
val coffeeshop3 = Coffeeshop("이디야 학동역점", "02-544-6467", "서울특별시 강남구 논현동 학동로 219", 37.515072, 127.033098)
coffeeshopAdapter?.items?.apply {
add(coffeeshop1)
add(coffeeshop2)
add(coffeeshop3)
}
binding.recyclerView.adapter = coffeeshopAdapter
}
- layout 추가하고 layout_above 설정
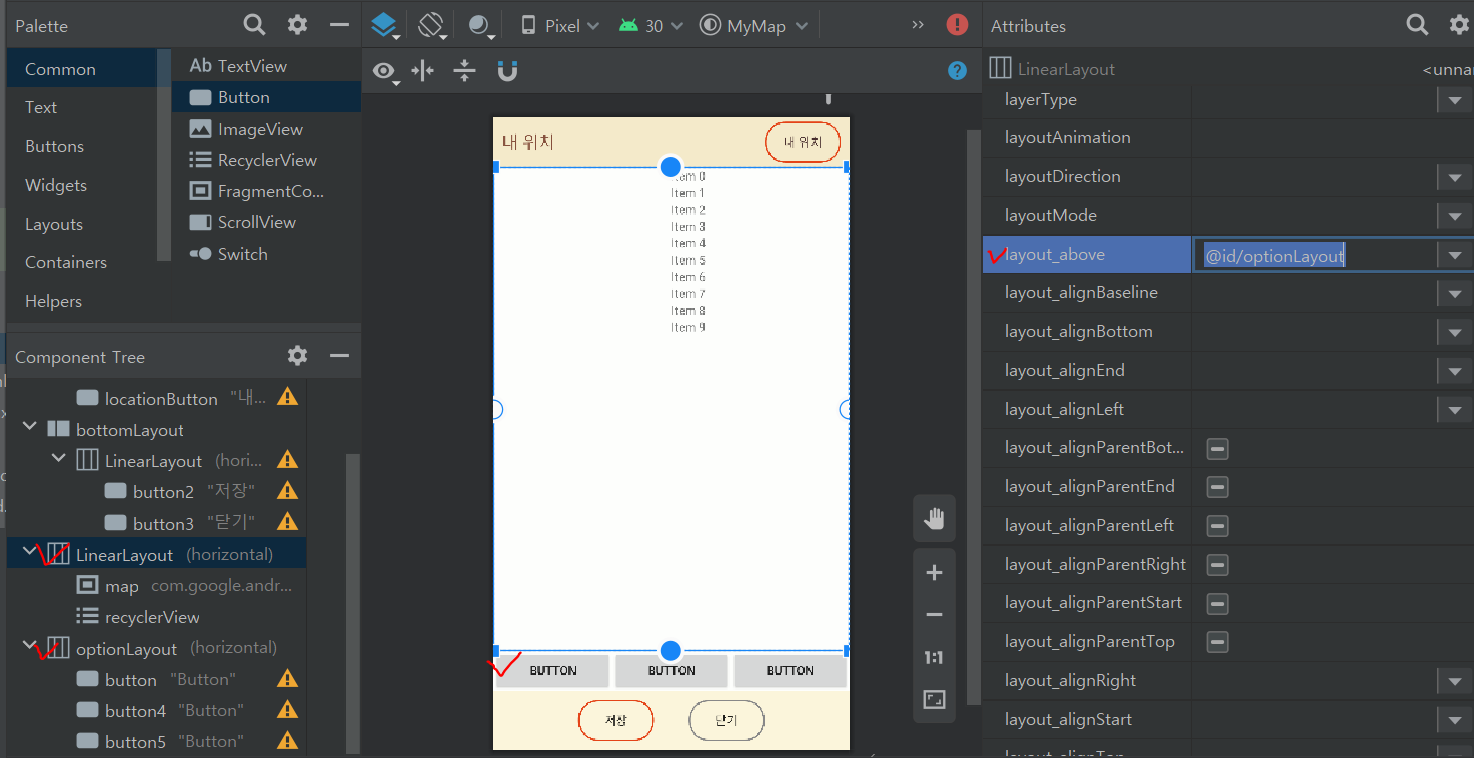
- MainActivity에 버튼 동작 등록 코드 작성하기

// 버튼 동작 등록하기
initButtons()
fun initButtons() {
binding.option1Button.setOnClickListener {
binding.map.visibility = View.VISIBLE
binding.recyclerView.visibility = View.VISIBLE
}
binding.option2Button.setOnClickListener {
binding.map.visibility = View.VISIBLE
binding.recyclerView.visibility = View.GONE
}
binding.option3Button.setOnClickListener {
binding.map.visibility = View.GONE
binding.recyclerView.visibility = View.VISIBLE
}
}
- 애뮬레이터 실행

- 지도(map)는 초기화 작업이 끝나야 뭔가를 추가할 수 있다.
지도 초기화 작업 코드 안에 코드 추가하기
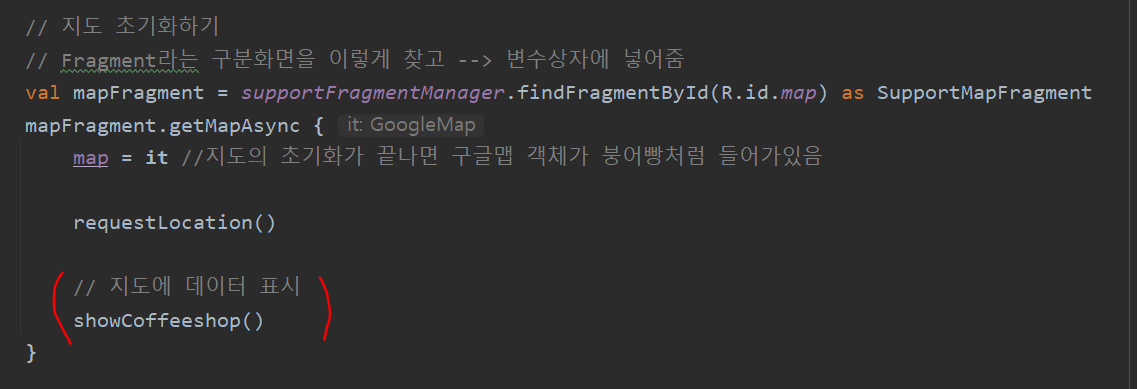
// 지도에 데이터 표시
showCoffeeshop()
showCoffeeshop() 메서드 작성하기
fun showCoffeeshop() {
        coffeeshopAdapter?.items?.apply {
            for (item in this) {
                val coffeeMarker = MarkerOptions()
                with(coffeeMarker) {
                    position(LatLng(item.latitude!!, item.longitude!!)) //언래핑(!!)으로 널값 아니라고 전제
                    title(item.name)
                    icon(BitmapDescriptorFactory.fromResource(R.drawable.coffee))
                    map.addMarker(this) //여기의 this는 MarkerOptions를 가르킴
                }
            }
        }
    }
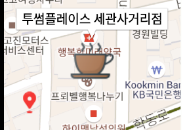
- 애뮬레이터 실행하기
내위치와 주변 커피숍 정보 같이 나옴
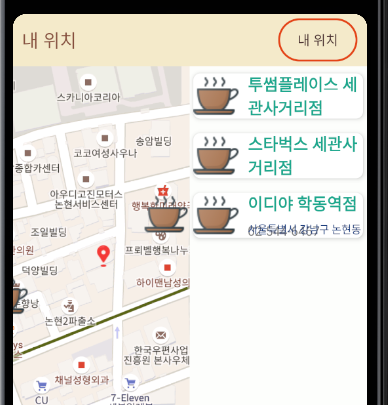
커피숍 아이콘을 클릭하면 아이콘 위치의 커피숍 이름이 나온다.
- 웹서버에 커피숍 정보를 저장하고 가져와보기
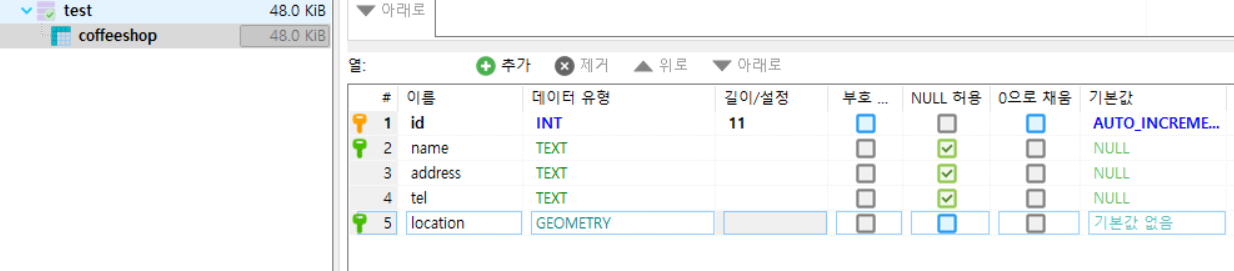
- HeidiSQL 실행 : coffeeshop 테이블 생성
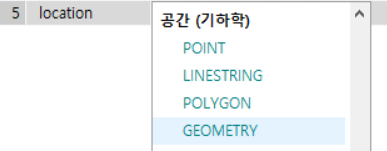
- location 컬럼에 경도, 위도 넣을 것임
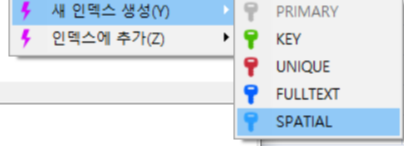
- spatial 로 키 설정
(테이블 생성 저장하면 초록색 키로 바뀜 ㄱㅊㄱㅊ)
- 생성할 테이블 컬럼
- 쿼리문 작성
* @g 에 경도위도 좌표 넣을것임
SET @g = ST_GEOMFROMTEXT('point(127.035002 37.515838)');
INSERT INTO test.coffeeshop
	(name, address, tel, location)
VALUES
	('투썸플레이스 세관사거리점',
	'서울 강남구 언주로 703',
	'02-545-2377',
	@g);
SELECT
id, NAME, address, tel,
ST_X(location) AS longitude,
ST_Y(location) AS latitude
FROM test.coffeeshop테이블에 잘 추가됨 (insert into문으로 3개까지 만들기)


- 내위치와 커피숍 위치간 거리를 계산해서 반경 내 커피숍 나타내는 쿼리문 작성
SET @g = ST_GEOMFROMTEXT('point(127.0352 37.5155)'); -- 내 현재 위치
SELECT
	id, NAME, address, tel,
	ST_X(location) AS longitude,
	ST_Y(location) AS latitude,
	ST_DISTANCE(@g, location)*111195 AS distance --거리계산된 값
FROM test.coffeeshop
WHERE
	ST_DISTANCE(@g, location)*111195 < 1000 --내 위치와 커피숍 위치의 거리계산, 1000m 이내
ORDER BY
	distance -- 거리 순으로 정렬
LIMIT 100
- VS Code에서 SQL문 실행해보기
- coffee-controller.js 만들기
- coffee_sql.js 만들기
- 터미널에 node index.js 입력후 엔터
- postman 실행
(와이,, 오류나지,, 코드이상없는데ㅠ)
- 웹서버에서 데이터를 가져올 거니까 샘플데이터로 추가해줬던 코드는 주석처리
- buildGrdle에 레트로핏 코드 추가
- api 폴더 만들고 > CoffeeApi.kt
- response 폴더 만들고 > CoffeeDistanceResponse에 포스트맨 send해서 뜬 코드 복붙
- MainActivity 코드 작성
(199줄 this에 오류남,,)
(MyMap4 프로젝트 통째로는 오류안남)
- MyTab 프로젝트 생성
- Fragment 분할화면
'지도API' 카테고리의 다른 글
| 5. 1006_ 안드로이드 앱 화면 (0) | 2021.10.06 |
|---|---|
| 4. 1005_ Fragment (0) | 2021.10.05 |
| 2.1001_Kotlin으로 Android Studio 프로젝트 생성 (0) | 2021.10.01 |
| 1. 0929_App, 아이디어회의 (0) | 2021.09.29 |

