
유디의 공간정보·개발일기
3. 0825_Vue 더 알아보기,, (오늘 Summary) 본문
Ex04
1. 환경변수에 path 추가 C:\Users\유저네임\AppData\Local\Yarn\bin
2. 터미널 창에 vue create ex04 또는 ./node_modules/.bin/vue.cmd create ex04 입력 엔터 - 설정
3. cd ex04 로 들어가서
yarn serve 또는 yarn.cmd serve 로 서버 실행 --> 웹페이지를 볼 수 있게 해주는 서버를 띄우는 것
- Local 에 뜨는 포트를 보고 주소 입력하면 됨
4. src>views>Home.vue, About.vue --> 화면이 각각 분리
5. auto close tag 플러그인 설치
6. Home.vue 코드 변경

- (Vs code) mustache : {{ }}
- show() 함수 사용하기

onclick에 걸어두고 function show() (x)

@click에 걸어두고 methods: {}안에 넣어야 함
- 둘 다 같은 기능인데 버전이 달라지면서 형식도 달라짐
=

- created / mounted / updated 함수
* mounted : jquery의 ready와 같음, Home.vue가 될 때마다 자동으로 호출됨
<Home.vue>Ex04
<template>
<div class="home">
<div>
<p>안녕!</p>
<p>인사 : {{ hello }}</p> <!--hello라는 변수상자를 가져와서 보여줌-->
<p id="output1"></p>
<p>입력한 값 : {{ input2 }}</p>
<input type="text" value="홍길동1" id="input1">
<input v-model="input2">
<input type="text" value="홍길동2" id="input3">
<input type="text" v-bind:value="inputValue">
</div>
<div>
<p v-if="visible1">안녕</p>
<ul> <!--번호가 없는 dot 리스트를 나타내는 태그-->
<li>홍길동1</li>
<li>홍길동2</li>
<li>홍길동3</li>
</ul>
<ul id="list1">
</ul>
<li v-for="person in people" :key="person.id"> <!--id 컬럼 추가하고 각각 표시-->
<p>{{ person.name }}</p>
<p>{{ person.age }}</p>
<p>{{ person.mobile }}</p>
</li>
<ul>
</ul>
</div>
<div>
<input class="btn btn-primary" type="button" value="확인" @click="show()">
<input type="button" value="확인2" @click="show2()">
<input type="button" value="바꾸기" @click="change()">
<input type="button" value="바꾸기2" @click="change2()">
<input type="button" value="보이기/감추기" @click="showHide()">
<input type="button" value="추가하기" @click="addItems()">
<input type="button" value="사람추가하기" @click="addPerson()">
<input type="button" value="목록 요청하기" @click="doList()">
<input type="button" value="안내 화면으로" @click="goTo('/about')">
</div>
</div>
</template>
<script>
import $ from 'jquery'
import axios from 'axios'
let count = 0
export default {
name: 'Home',
components: {
},
data() {
return {
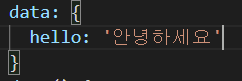
hello: '안녕하세요.', //data안에 hello라는 속성(변수상자)
clickCount: 0,
input2: '',
inputValue: '',
visible1: true,
people: [
{
id:0,
name:'홍길동1',
age:21,
mobile:'010-1000-1000'
},
{
id:1,
name:'홍길동2',
age:22,
mobile:'010-2000-2000'
},
{
id:2,
name:'홍길동3',
age:23,
mobile:'010-3000-3000'
}
]
}
},
methods: {
show() {
console.log(`show 함수 호출됨 : ${count}`)
count += 1 //버튼 클릭할 때마다 뭔가를 바꾸고 싶다면
console.log(`show 함수 호출됨 : ${this.clickCount}`)
this.clickCount += 1
},
show2() {
console.log('show2 함수 호출됨.')
const input1 = $('#input1').val()
$('#output1').text(`입력한 값 : ${input1}`)
},
change() {
console.log('change 함수 호출됨.')
$('#input3').attr('value', '홍길동3') //attribute : 태그의 속성을 바꿀 수 있다
},
change2() {
console.log('change2 함수 호출됨.')
this.inputValue="뉴 홍길동1"
},
showHide() {
console.log('showHide 함수 호출됨.')
this.visible1 = !this.visible1 //버튼을 클릭할 때마다 바뀌게 하는데 !(not)를 붙여서 T/F를 반대로 넣어줌
},
addItems() {
console.log('addItems 함수 호출됨.')
$('#list1').html(`<li>홍길동1</li>
<li>홍길동2</li>
<li>홍길동3</li>`) // 버튼을 누를 때 html()안의 내용이 나오게 하기
},
addPerson() {
console.log('addPerson 함수 호출됨.')
const person = {
name:'뉴 홍길동1',
age:31,
mobile:'010-5000-5000'
}
this.people.push(person) //push()안의 값이 people[]에 추가된다
},
doList() {
console.log('doList 함수 호출됨.')
const page = 1
const perPage = 10
axios({
method:'get',
url:`http://localhost:8001/test1?page=${page}&perPage=${perPage}`,
responseType:'json'
}).then((response) => {
console.log(`요청에 대한 응답 : ${JSON.stringify(response.data.output.body)}`)
this.people = response.data.output.body
}).catch((err) => {
console.log(`에러 발생 : ${err}`)
})
},
goTo(path) { //>router>index.js에 path있음
this.$router.push(path)
}
},
created: () => {
console.log('created 함수 호출됨.')
},
mounted: () => { //Home.vue가 될 때마다 자동으로 호출됨 (=jquery의 ready)
console.log('mounted 함수 호출됨.')
},
updated: () => {
console.log('updated 함수 호출됨.')
}
}
</script>

7-1. jquery사용하기
터미널 창에 yarn.cmd add jquery 입력 엔터 <-- jquery 외부모듈 설치
import문 추가, input type="button"에 @click="show2()", methods안에 show2() 만들기
const input1 = $('#input1').val()
$('#output1').text(`입력한 값 : ${input1}`)
입력상자에 데이터를 입력하면 알아서 가져옴
--> jquery 사용을 추천하지는 않,,
7-2. v-model
입력상자에 데이터를 입력하면 알아서 가져오는 게 아니라 데이터의 변수상자 ' ' 안에 넣어주는 것
7-3. v-bind / change2()
바꾸기2 버튼을 눌렀을 때 change2()가 실행되고, inputValue값을 바꿔주는데
입력상자 안에 '뉴 홍길동1'이 뜨면서
updated함수도 같이 호출됨
8. v-if / showHide()
보이기/감추기 버튼을 눌렀을 때 showHide()가 실행
버튼을 클릭할 때마다 바뀌게 하는데 !(not)를 붙여서 T/F를 반대로 넣어줌
true라면 '안녕'이 보이고, false라면 안보이게 됨
9-1. <ul>, <li> 태그 / addItems()
<ul> : 번호가 없는 dot 리스트를 나타내는 태그
추가하기 버튼을 누르면 html()안에 쓴 자바스크립트 코드가 나오게 됨
9-2. v-fordata()에 people: [] 속성 추가


- addPerson()안에 추가할 새 데이터(뉴 홍길동1 님,,)를 넣고
사람추가하기 버튼을 누르면 새 데이터가 추가돼서 나타남
10. >public>index.html
mdb폴더--> ex04>public 폴더 안에 붙여넣기
부트스트랩 코드 붙여넣기
<!DOCTYPE html>
<html lang="">
  <head>
    <meta charset="utf-8">
    <meta http-equiv="X-UA-Compatible" content="IE=edge">
    <meta name="viewport" content="width=device-width,initial-scale=1.0">
    <link rel="icon" href="<%= BASE_URL %>favicon.ico">
    <title><%= htmlWebpackPlugin.options.title %></title>

    <!-------------부트스트랩을 위한 CSS 파일 불러오기-------------->
    <!--  Font Awesome  -->
    <link rel="stylesheet" href="https://use.fontawesome.com/releases/v5.11.2/css/all.css">
    <!-- Bootstrap core CSS -->
    <link href="./mdb/css/bootstrap.min.css" rel="stylesheet">
    <!-- Material Design Bootstrap -->
    <link href="./mdb/css/mdb.min.css" rel="stylesheet">
    <!------------------------------------------------------------->
  </head>

  <body>
    <noscript>
      <strong>We're sorry but <%= htmlWebpackPlugin.options.title %> doesn't work properly without JavaScript enabled. Please enable it to continue.</strong>
    </noscript>
    <div id="app"></div> <!--얘는 요거밖에 없당-->
    <!-- built files will be auto injected -->

    <!------------부트스트랩을 위한 JS 파일 불러오기------------->
    <!-- JQuery -->
    <script type="text/javascript" src="./mdb/js/jquery.min.js"></script>
    <!-- Bootstrap tooltips -->
    <script type="text/javascript" src="./mdb/js/popper.min.js"></script>
    <!-- Bootstrap core JavaScript -->
    <script type="text/javascript" src="./mdb/js/bootstrap.min.js"></script>
    <!-- MDB core JavaScript -->
    <script type="text/javascript" src="./mdb/js/mdb.min.js"></script>
    <!------------------------------------------------------------------>

  </body>
</html>
- 앵귤러(Angular) : 앞단페이지(프론트엔드)를 만들때 화면을 분리시키고 구조화
리액트 버튼
- Vue buttons 사용방법 //Vue를 위한 라이브러리가 별도로 있다는 것
https://mdbootstrap.com/docs/b5/vue/components/buttons/
Vue Buttons - examples & tutorial. Bootstrap & Material Design
Responsive Vue Buttons built with the latest Bootstrap 5. Multiple code examples: toggle button, button click, switch button, button disabled, outline button & many more.
mdbootstrap.com
11. 웹서버로 요청받아서 화면에 응답받고 보여주고 싶을 때 : axios 사용
터미널창에 서버 중지시키고
yarn.cmd add vue-axios axios 입력 엔터(2개를 같이 설치하는 것)
main.js에
import문 쓰고, .use(VueAxios, Axios) 코드 추가
import VueAxios from 'vue-axios'
import Axios from 'axios'

createApp(App).use(store).use(router).use(VueAxios, Axios).mount('#app')
Home.vue에 목록요청하기 버튼 추가하고 doList()함수 안에 axios코드 추가
import axios from 'axios' 추가
>ubiaccess의 index.html에서 터미널 node index.js 입력하고 실행시키는 것 먼저 하기!
this.people = response.data.output.body
12. 버튼을 누를 때 화면이 바뀌게 하기 : router>index.js에 path확인
Home.vue에서 '안내화면으로' 버튼 추가하고 goTo() 함수 추가
goTo(path) { //>router>index.js에 path있음
      this.$router.push(path)
    }
Ex05
Home.vue에 코드 추가
<input type="button" value="안내 화면으로2" @click="goToByName()">
goToByName() {
      const selectedPerson = {
        id:1,
        name:'홍길동1',
        age:21,
        mobile:'010-1000-1000'
      }
      this.$router.push({name: 'About', params: selectedPerson}) //화면쪽으로 params를 전달
    }
About.vue
<template>
  <div class="about">
    <h1>안내 화면</h1>

    <div>
      <p>전달받은 사람 : {{ $route.params.name }}</p>
    </div>

  </div>
</template>

<script>
export default {
  name:'About',
  data: () => ({

  }),
  methods: {

  },
  mounted: () => {
    console.log('About화면의 mounted 함수 호출됨.')

    //console.log(`전달받은 이름 : ${this.$route.params.name}`)
  }
}
</script>
--> 작동방식 :
안내화면2 > gotoByName > this.$router.push({name:'About', params:this.people[this.selectedPerson]}) >
people[0] 인 사람 파람즈로 전달! >
about.vue 보면
<p> 전달받은 사람 : {{$route.params.name}}</p>이라서 파람스 name = 배열에 0인사람 이름이 전달됨
Home.vue 코드 수정
selectedPerson:0goToByName() {
// const selectedPerson = {
// id:1,
// name:'홍길동1',
// age:21,
// mobile:'010-1000-1000'
// }
// this.$router.push({name: 'About', params: selectedPerson}) //화면쪽으로 params를 전달
this.$router.push({name:'About', params:this.person[this.selectedPerson]})
}>store폴더 >index.js 에 코드 추가
state: {
    people: [
      {
        id:0,
        name:'홍길동1',
        age:21,
        mobile:'010-1000-1000'
      },
      {
        id:1,
        name:'홍길동2',
        age:22,
        mobile:'010-2000-2000'
      },
      {
        id:2,
        name:'홍길동3',
        age:23,
        mobile:'010-3000-3000'
      }
    ]
  },
Home.vue 코드 (또) 수정
<div>
      <p>store의 첫번째 사람 이름 : {{ this.$store.state.people[0].name }}</p>
    </div>
<div>
      <input type="button" value="store의 사람이름 바꾸기" @click="changeStorePerson()">
    </div>
changeStorePerson() {
console.log('changeStorePerson 함수 호출됨.')
this.$store.state.people[0].name = '뉴홍길동1' //people[0]의 값을 '뉴홍길동1'로 바꾼다
}
About.vue 코드 (또또) 추가
<div>
      <input type="button" value="store에 사람 추가하기" @click="addPerson()">
    </div>
methods: {
addPerson() {
console.log('addPerson 함수 호출됨.')
const person = {
id:11,
name:'홍길동11',
age:31,
mobile:'010-6000-6000'
}
this.$store.state.people.push(person) //배열에 위의 person정보를 push로 넣어준다
}
Home.vue에 코드 (또,,) 추가 : 몇 사람이 있는지 보여주기
<div>
      <p>store의 첫번째 사람 이름 : {{ this.$store.state.people[0].name }}</p>
      <p>store의 사람 수 : {{ this.$store.state.people.length }}</p>
    </div>
--> 브라우저에서 about > 사람추가하기 > 홈으로 돌아가면 <store의 사람 수 : 4> 로 뜸
- VueX 중앙저장소
About.vue 코드 추가,, : v-model
<div>
      <p>전달받은 사람 : {{ $route.params.name }}</p>

      <input v-model="person.id">
      <input v-model="person.name">
      <input v-model="person.age">
      <input v-model="person.mobile">
    </div>

    <div>
      <input type="button" value="store에 사람 추가하기" @click="addPerson()">
      <input type="button" value="store에 사람 추가하기2" @click="addPerson2()">
    </div>
data: () => ({
person: {
id:0,
name:'',
age:0,
mobile:''
}
}),addPerson2() {
console.log('addPerson2 함수 호출됨.')
this.$store.state.people.push(this.person)
//console.dir(this.$store.state.people) //dir : 전부 출력
console.log(JSON.stringify(this.$store.state.people))
}
>store의 index.js getters: 와 mutations:
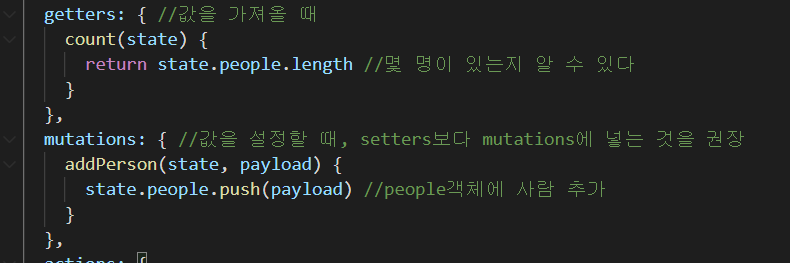
✔ payload는 addPerson3에서 person데이터값 받은 것
✔ addPerson3
> mutation안에 있는 함수가 실행
> 그래서 addPerson어쩌고해서 데이터를 받아오고 payload로 푸쉬
About.vue에


* mutations : 변경 가능한 것

index.js actions:

About.vue에
<input type="button" value="store에 사람추가 요청하기" @click="addPerson4()">
'Node.js' 카테고리의 다른 글
| 4. 0826_복습 (0) | 2021.08.26 |
|---|---|
| 2.0824_ react.js / vue.js /윈도우 유저네임 3년만에 바꾸기 성공,, (0) | 2021.08.24 |
| 1-2. 0823_Pagination 코드로 설정하기 (0) | 2021.08.23 |
| 1-1. 0823_복습 정리 겸 postman으로 웹서버 연결 (0) | 2021.08.23 |


